¶ Making your custom weapon
¶ Overview
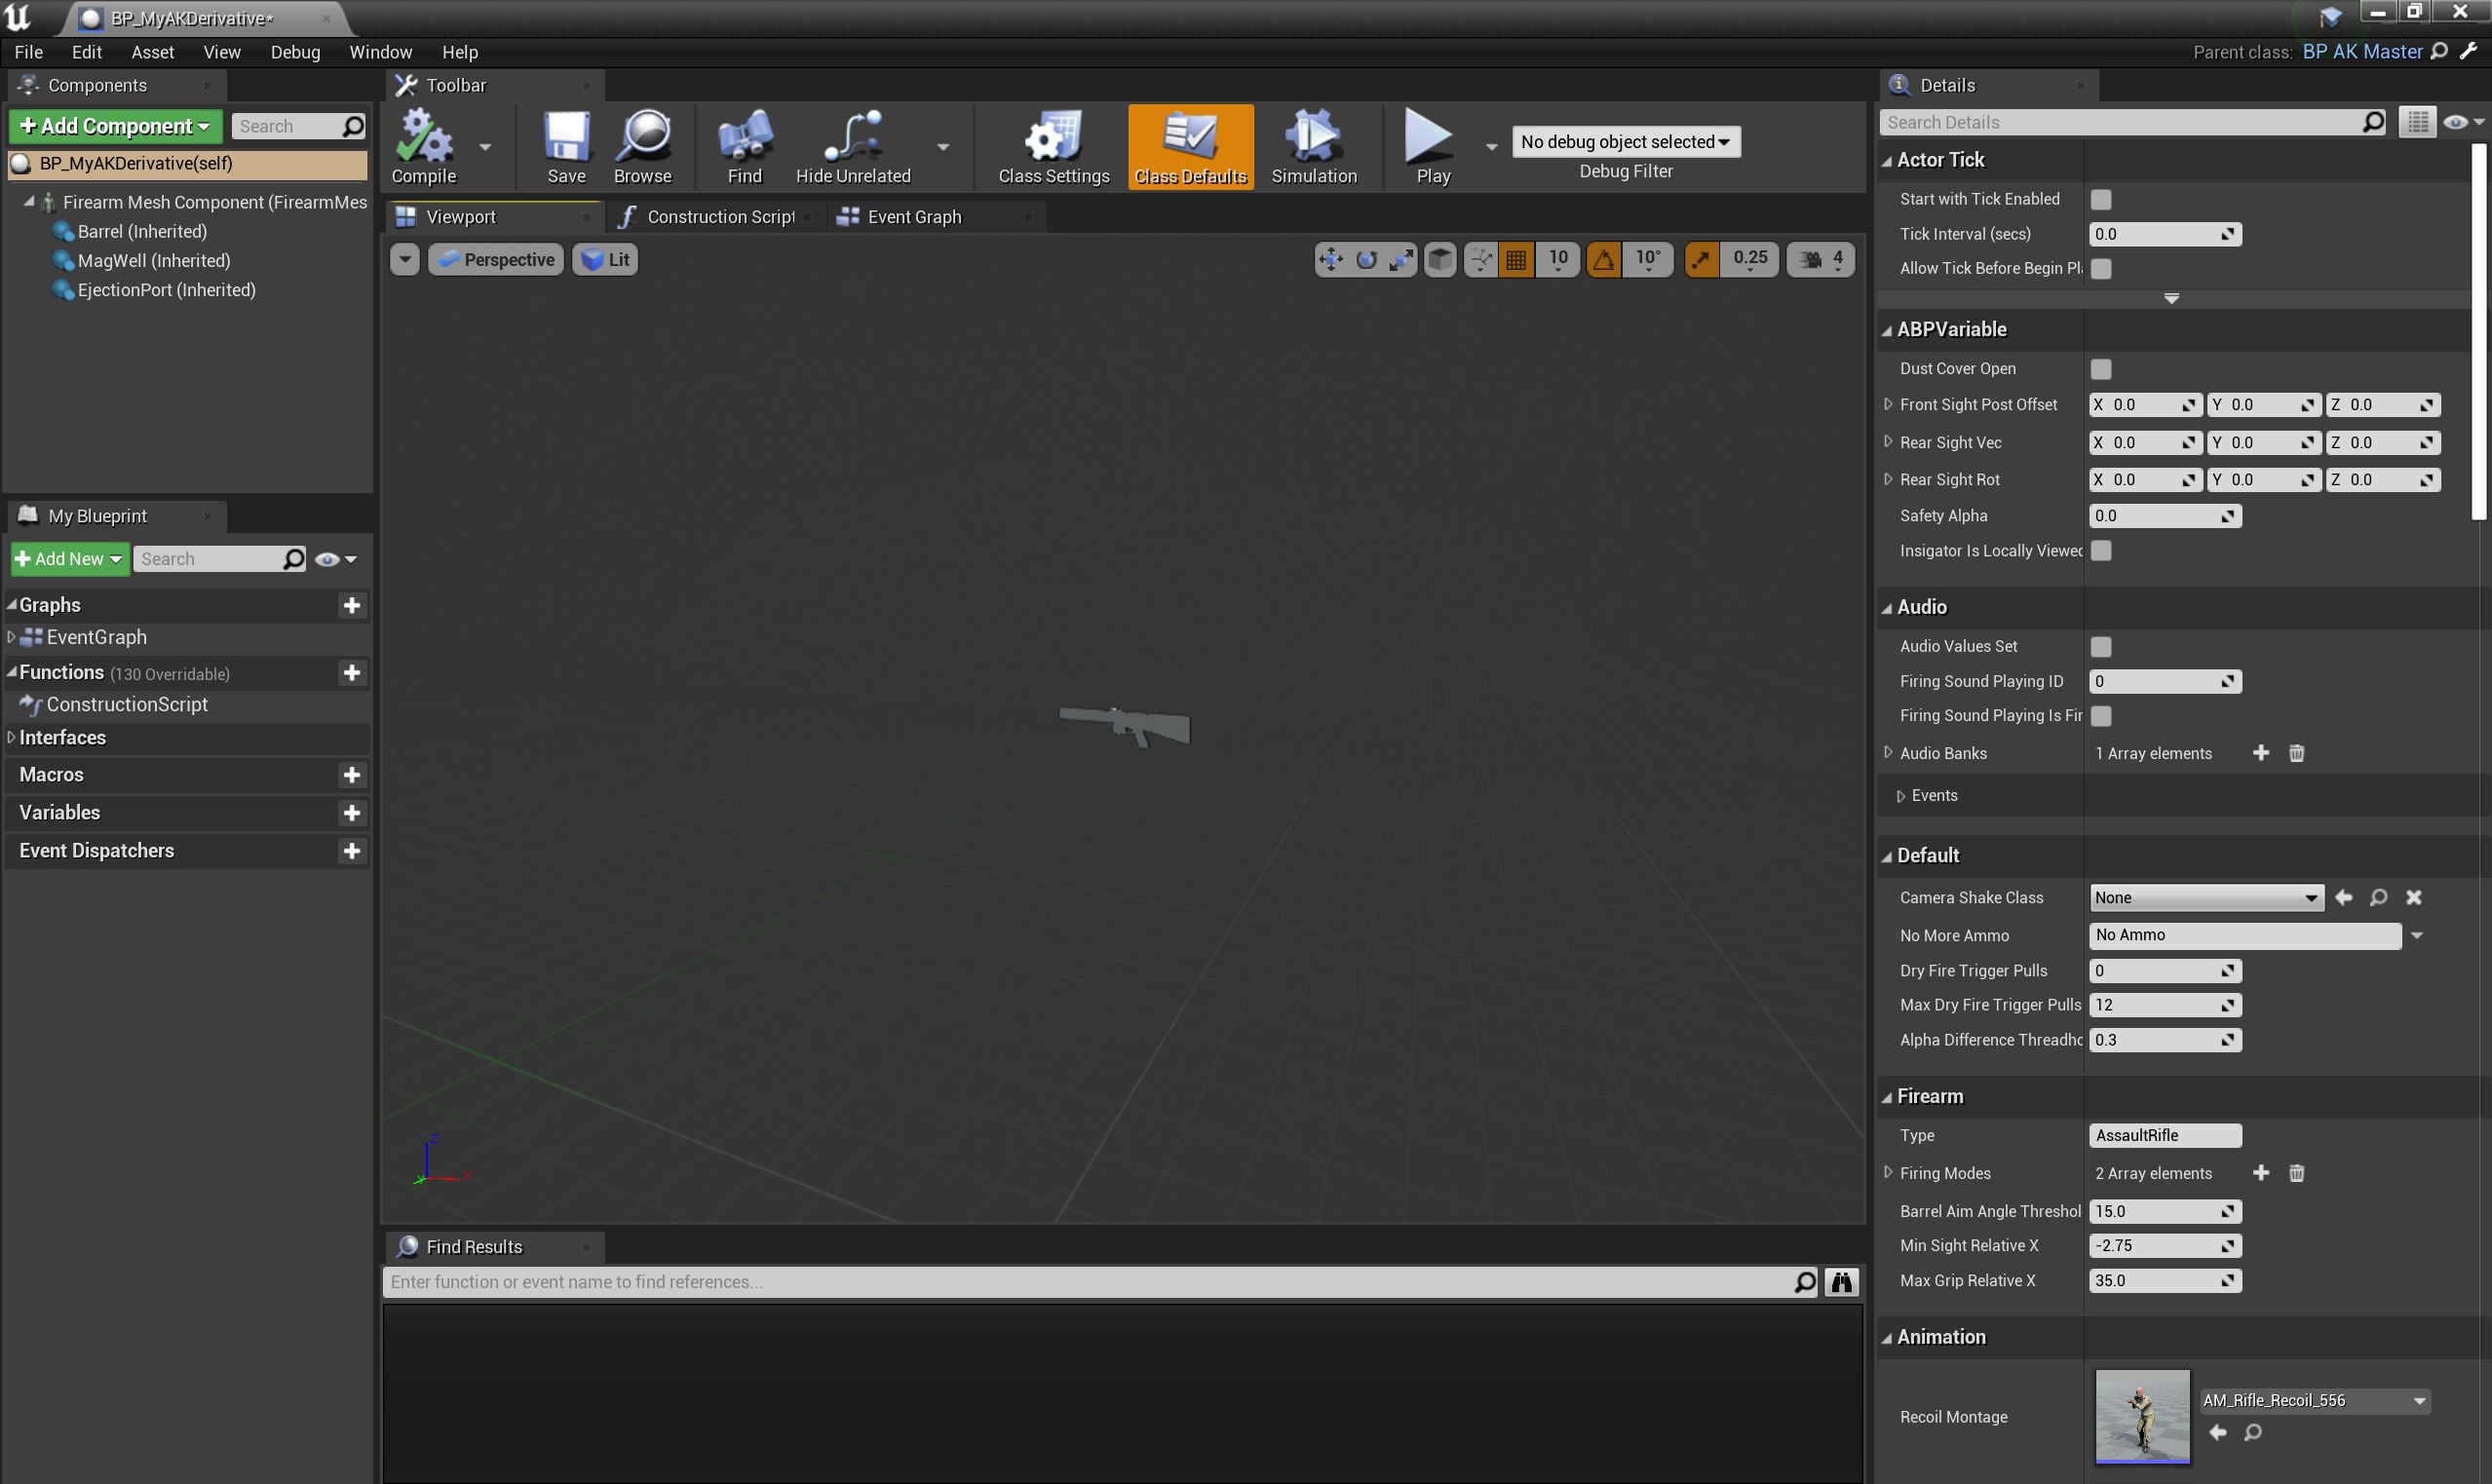
To start making a weapon mod, follow the usual steps to create a mod, find an appropriate master blueprint (BP_Handgun_Master for sidearms, or see this list for primary weapon master blueprints). Then create an appropriate child blueprint. This guide assumes that you have followed these steps and have your new custom BP open like so:

You MUST choose a unique name for your blueprint that is not used by any other asset of the same type (PrimaryFirearm, Sidearm, etc.). Consider putting your name in the title, or have some other unique naming convention that is unlikely to overlap with either stock in-game weapons, or the same weapon made by another modder (yes, it happens). So BP_Fatmarrow_Mk23, for example, instead of plain BP_Mk23 (which would, in fact, clash with one of our example mods).
|
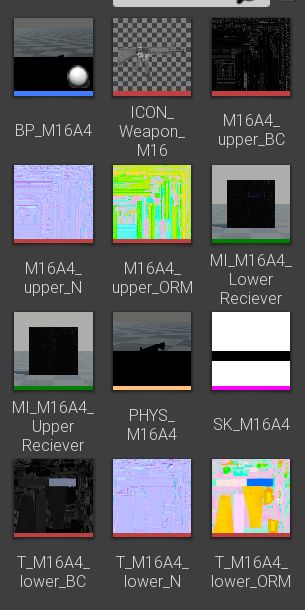
A weapon mod can be a complex item to set up. Here, for example, are some (not all) files needed for the in-game stock M16A4 rifle. See below for more details of what these files typically include:

¶ Setting basic blueprint properties
Please see here for a run-down of (nearly) all of the properties in your new custom firearm blueprint.
Also see here for a list of available in-game bullet calibers: bullet calibers in GROUND BRANCH.
¶ Setting up the skeletal mesh
First of all, you will most likely start by putting in a new firearm model (skeletal mesh) and skin (material) into the Firearm Mesh Component properties.
You will need to make sure that your skeletal mesh model is skinned properly before importing into the Mod Kit (see skinning weapon models for more details).
You will need to make sure you have properly set up your skeletal mesh, so that all the animation aspects will work properly.
When making your materials/skins for the weapon, you may wish to use existing GROUND BRANCH master materials for ease of use and consistency with existing in-game assets.
You will also want to make sure any new materials have appropriate physical materials set, typically an appropriate mix of PM_FirearmMetal and PM_FirearmPlastic.
¶ Setting up blueprint components
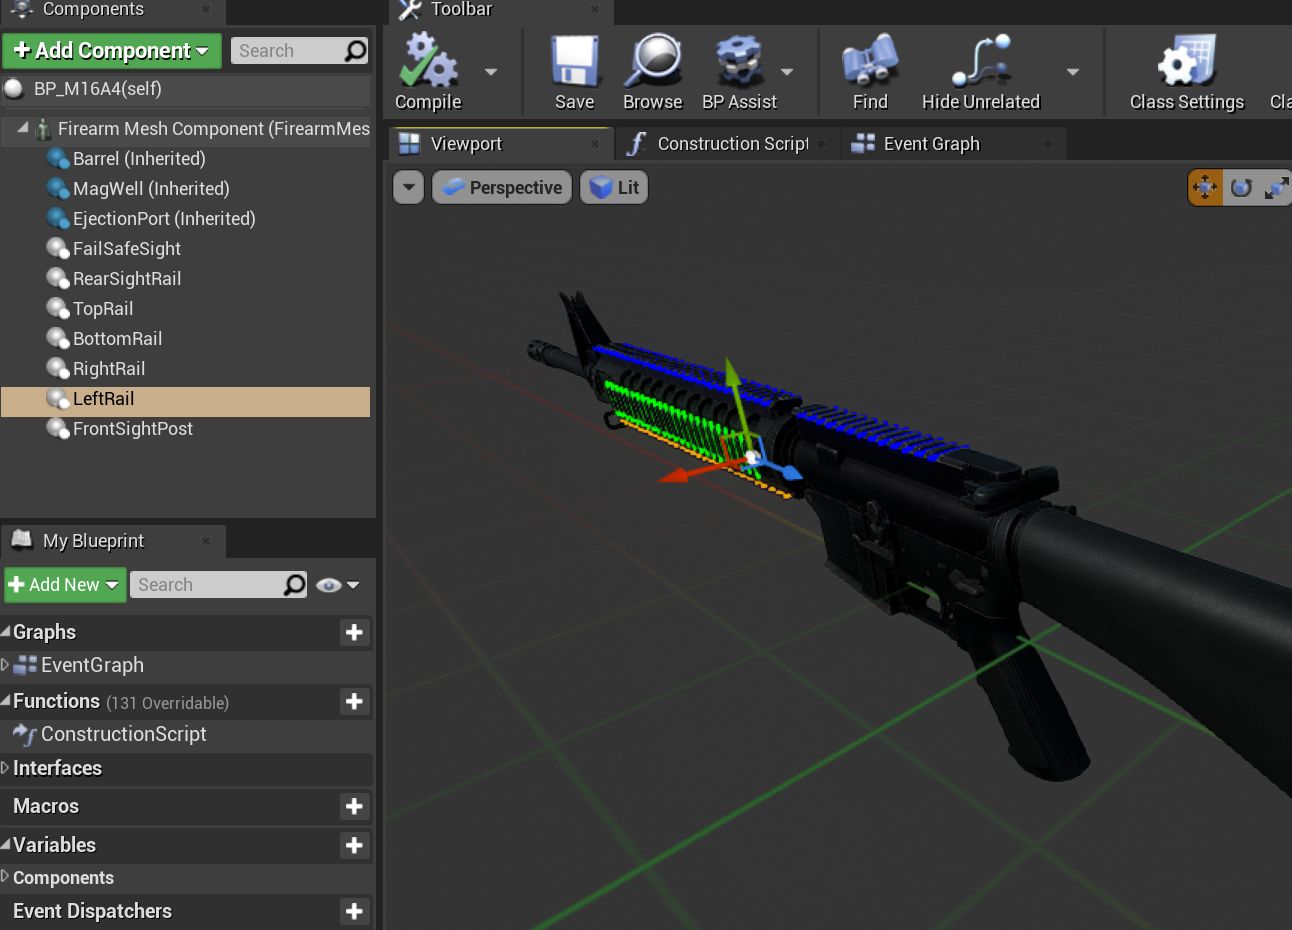
You may need to add additional components to your weapon in the blueprint editor. Here, the in-game M16A4 blueprint is shown, including additional GBSight components for the built-in iron sights (FailSafeSight, FrontSightPost), and a number of GBRail components to define attachment points for the picatinny rails (RearSightRail, TopRail, BottomRail, RightRail, LeftRail), as shown here:

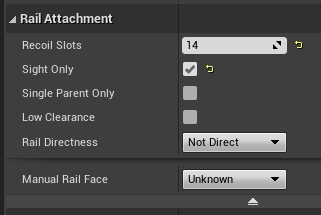
Typically each component has further configuration options that can be used to customise your weapon further, such as the GBRail components, for example:

These is the minimum list of components that are necessary for a working weapon in GROUND BRANCH:
-
Barrel (GBBarrelComponent)
-
Magwell (GBExternalMagazineComponent) or TubeMag or InternalMagazine equivalent.
-
Ejection port (GBEjectComponent)
See here for a list of all of the GROUND BRANCH custom weapon blueprint components, including rails, ejection ports, magwells, barrels and (built in) sights.
¶ Ancillary items
You may need to make your own custom magazine. See modding magazines.
You may also need to make a custom suppressor. See modding muzzle devices.
If you wish to use your own custom sounds, see adding sounds with Wwise.
¶ Custom blueprint code
With all the weapon features now defined in your blueprint, you may need to add custom code to your weapon blueprint to handle custom behaviour for your specific weapon. See weapon blueprint code examples for more information on weapon events and functions that you can and may want to override in the blueprint event graph.
¶ Default item build
You should also create a default item build for your weapon, at least to add a magazine as a default item.
¶ Weapon icon
You will need to make an icon for your weapon also. See here for some ideas of how to do that: creating item icons.
¶ LODs (Level of Detail)
You will almost certainly need to set up appropriate LODs for your skeletal mesh so that, even quite close up, your gun will draw with a reduced poly count. If everyone is mingling in the ready room, frame rates will tank unless LODs are carefully set up. Similarly, make sure your gun is relatively low poly when at medium to far distances.
¶ Setup complete
Congratulations! At this point, your weapon should be set up. Go package and upload it, and have a test.
¶ Trouble-shooting your custom weapon
There’s a lot that can go wrong when making a weapon mod, and weapon setups are quite complex. We can’t predict every possible failure path. That said, here are some issues that have come up while making weapon mods, and some possible solutions:
The custom magazine does not show up in the configuration screen for my custom weapon
→ Make sure the same magazine type is used in the magazine and in the magazine component ('MagWell') of the weapon.
I can’t see the weapon in the editor
→ Make sure you have the most up-to-date version number in your default item build (.kit) file
→ Make sure the mod is packaged and uploaded, and try quitting the Mod Kit to let the mod update
→ Make sure there is no JSON error in your default item build
→ Check the log to see if anything is throwing an obvious error
I can’t see the default item build in the editor
→ This is correct. You can only see default item builds (.kit files), loadouts and other non-asset files in a normal folder viewer. See non-asset file types for a non-exhaustive list of such files.
My handgun sounds like an AK
→ Make sure you have filled in both the Audio and Sound sections in your custom weapon blueprint, as documented here.
I get this error when packaging: UATHelper: Packaging <MyMod> (Windows): LogGB: Error: BP_<MyMod>_C has no DefaultMagazineClass set.
→ You need to set the DefaultMagazine class in the MagWell component of your weapon
The top rail works, but only for attachments
→ Check that the relevant rail component is not contained within a physics collision element. A bit of the rail needs to stick out from the physics element.
I am not sure how to add a suppressor
→ You need to add the mesh and make a blueprint for it, then setup the socket on the weapon and match the naming conventions, and set the name in the barrel component. It’s called Muzzle Device Thread in the suppressor BP. Just add the name of the socket that you created on the mesh there and it should work.
I cannot see my new custom suppressor in the weapon editing screen / I only see the standard suppressor
→ See above. You need to do all of (a) create a custom mesh socket on the skeletal mesh, (b) enter the same socket name in the custom suppressor (MuzzleDevice), and (c) enter the same socket name in the barrel component of the weapon. Otherwise, you will not see the suppressor in the weapon editor accessory list.
I have made the same gun as someone else, but mine/theirs does not show up in the list of weapons in the character editor
→ You may have used the same blueprint name as the game / the other mod. If you have used the same name, you will also have used the same primary asset ID (e.g. PrimaryFirearm:BP_MyGun), and this will break a ton of stuff. Consider having some kind of unique reference in your weapon blueprint names, e.g. your modding handle, to avoid name clashes with the game and also (more importantly perhaps) other mods.
I can’t attach sights to my top rail
→ Make sure the top rail blueprint component has SightsOnly checked, is set to Direct rail, and that the rail component is sticking out of the physics elements. See skinning weapon models.
→ Make sure the top rail has the correct orientation. The component origin/pivot point should be at the rear of the weapon relative to the rest of the rail. See rail component.
The master version of my weapon did not have a burst mode, and did not have burst mode sound effects. I plugged in a burst sound effect from a different weapon master, but it sounds horrible
→ It may work if you re-use the auto event (the PLoop Event SFX property) in the burst fire event property (PBurst Event SFX). Then your sounds will be more consistent.
I have set up multiple weapon skins but I can’t choose them in the character editor
→ Weapon skins (that is, using the GROUND BRANCH Skin System, where skins are selectable via the top right of an item in the character inventory list) are not supported in 1034.5. They may be supported in later versions of GROUND BRANCH.
I made a default item build for my weapon but it’s not showing up
→ You have to manually save the weapon BP after you create or update the default item build .kit file in order for it to be saved with the weapon BP.
People say my mod is too big
→ If you obtained your weapon model from a marketplace of some kind, bear in mind that people often include very high res textures (and sometimes very high res models). Consider setting a texture LOD bias in your textures so that 4k textures are downsampled to 2k textures when being cooked for your mod.
People say my mod is too slow
→ Make sure you aren’t using a very high poly model for your weapon. One of the most complex guns in Ground Branch is the Mk46 MOD 1, which has around 60k polygons. The current M1014 shotgun model, meanwhile, has around 9k polygons. Somewhere around 10k-20k polygons is a good spot to aim for if you can for the base model. If you are using a 500k poly model for your gun, and everyone in the ready room is equipped with it, frames will tank and your mod won’t get hosted again that often. But don’t forget LODs! The Mk46 MOD 1 has 5 of them. See below…
→ Make sure you have LODs set up! Your base weapon is probably a quite high poly model. If you are hanging around a ready room or in a squad where everyone else has a high poly model gun, frame rates are going to tank. Make sure you have low poly LODs of the gun and relatively large screen sizes, so you don’t have to render too much at once.
→ If you have very big textures in your model (clue: people also complain your mod is too big), consider downsampling them as explained above. This can solve stutters caused by texture streaming, for example if everyone in the ready room is packing a different gun with 4k textures.
I am getting errors about bones not being found

→ Your 3d editor program of choice has automatically inserted new bones into your skeletal mesh. Make sure you delete all the new bones before re-importing back into the Mod Kit. Quite often 'end' bones are added. These should all be deleted unless present in the original skeleton.