ITEM NAME =
(Naming convention)
Examples
No responsibility is taken for the contents of this document or how you might use it or rely on it; this document may not be fully up-to-date and may contain errors._
In GROUND BRANCH mission editing, a lot of standard naming conventions are used. These will be indicated in the following format:
ITEM NAME =
(Naming convention)
Examples
In some cases this is just user preference. In others it is necessary in order to allow all features to work (e.g. automatic assignment of squads).
GROUND BRANCH includes a number of built-in game modes, and can run a further number of modded game modes. Built in game modes include (at time of v1034 release of GROUND BRANCH):
“Co-op” modes (1 team v AI)
Terrorist Hunt
Intel Retrieval
Defuse New in v1034
Extraction New in v1034
“PVP” modes (2 teams playing against each other)
Uplink
Team Elimination
Deathmatch
Dynamic Take And Secure
Hostage Rescue
“Training” mode
Training
Whether editing a co-op or pvp mode, select Lone Wolf from the main menu, and open any mission (Terrorist Hunt or Intel Retrieval) for the map you want to create or edit missions for.
When you spawn into the Ready Room, press the console key (` by default, possibly keypad *, or other keys on non-English speaking country keyboards) and type editmission.
You will now see the mission user interface. You now need to navigate around the map to find the playable area.
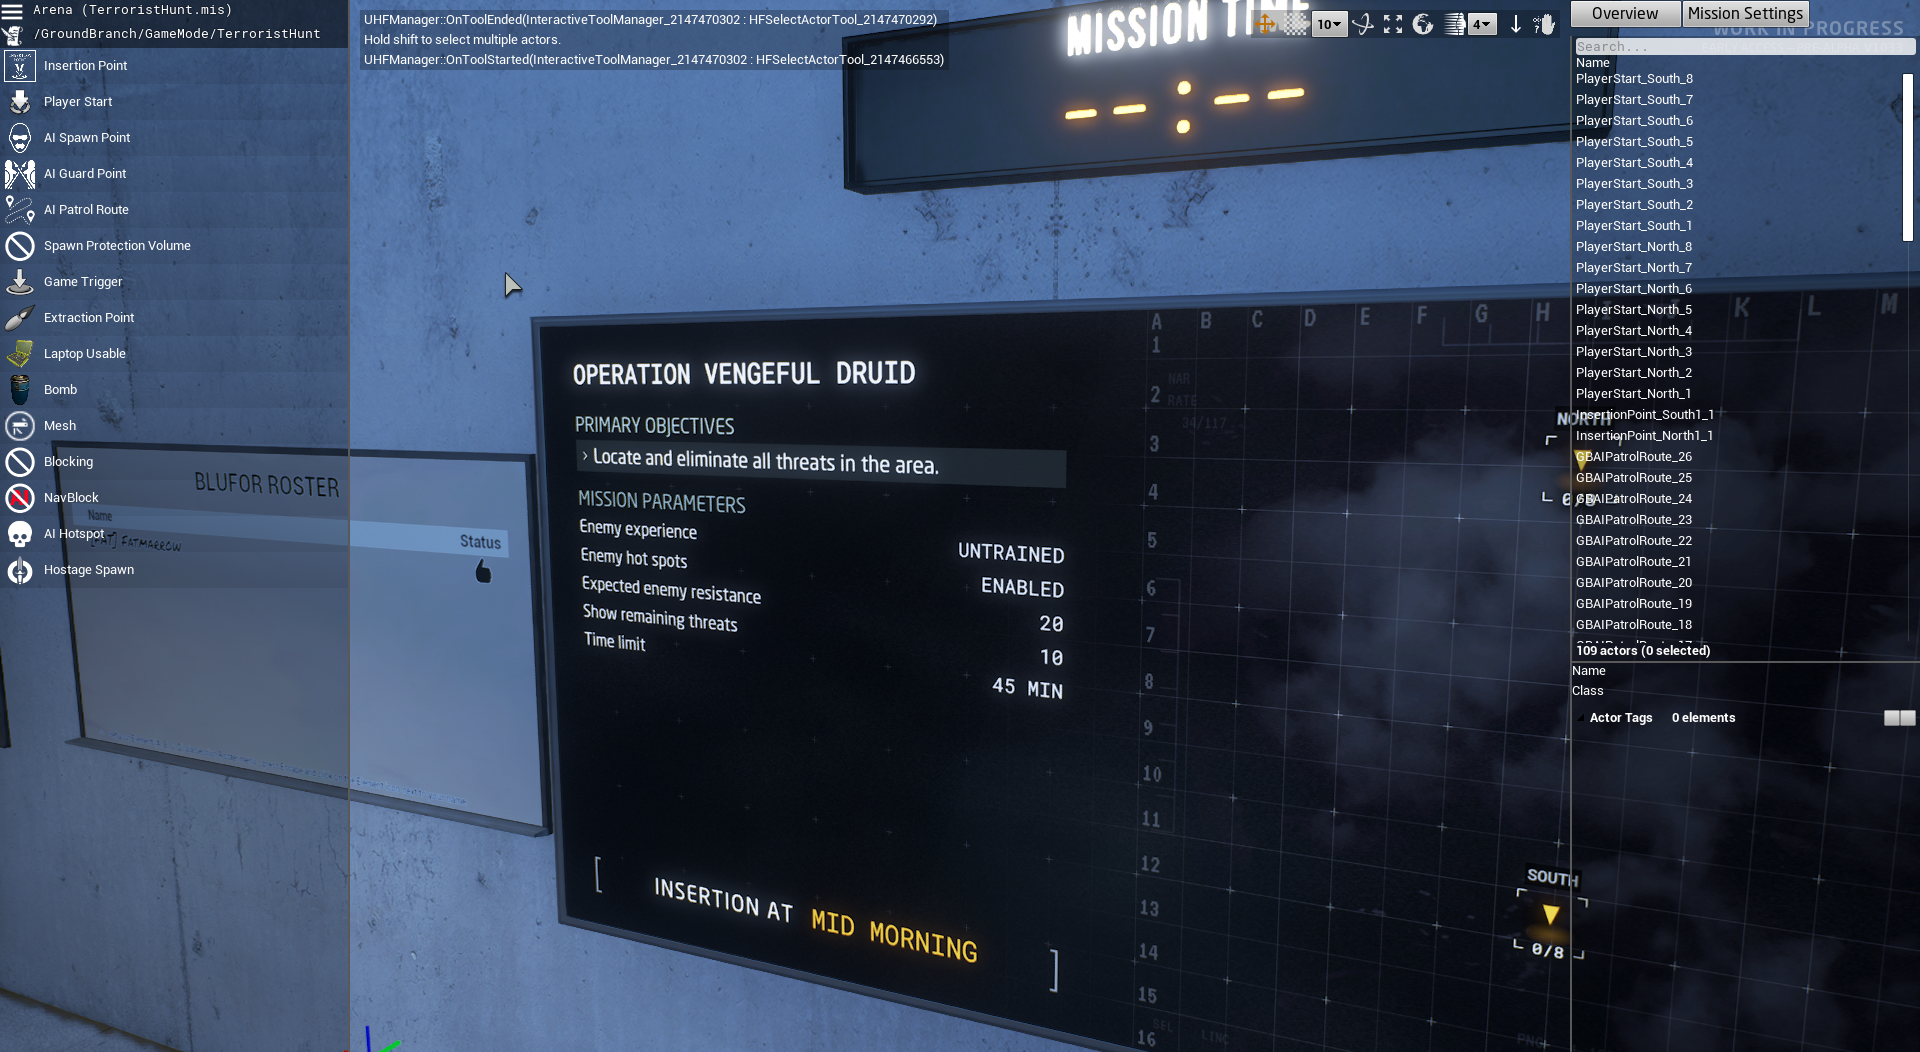
You should see the menu bar on the left-hand side, with a couple of menus and a number of placeable mission objects to select from.
On the right-hand side is the current list of mission objects (top), and a data entry window for any selected mission object or objects (bottom).
At the top, centre-right is a mission edit toolbar.
These features will now be explained in more detail.
To move around the map, hold down the right mouse button, and press a movement key. The movement keys include WASD and the arrow keys for lateral movement, and QE for vertical movement. You can move your view around using the mouse as normal.
While moving you can use the middle mouse button to change movement speed, or you can use the movement speed controls in the toolbar:

The Ready Room is usually located below the playable area, and often off to the side. To reach the playable area, the easiest thing is to point the mouse at the ceiling, right click and press W to move forwards. You will likely want to increase the movement speed as described above.
At some point you should reach an open space with sky. You will then need to move around and move (at speed) towards your best guess at where the level is (you will find this easier with time).
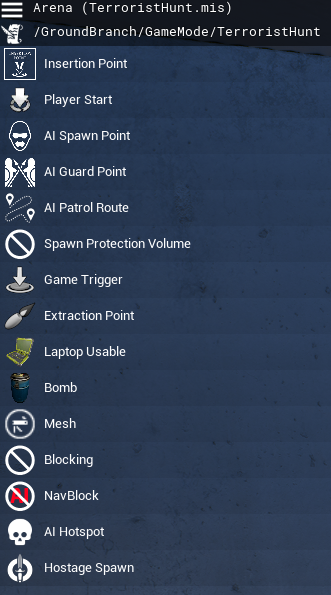
The mission editor has a list of icons and text on the left hand side, providing menus of actions, and mission objects that you can drag into the level. In more detail:
Action Menu (three horizontal stripes): options to load and save the current mission
Script Menu (paper and pencil icon): options to select game mode script for mission
Insertion Point: set an insertion point in the level (which shows up on the map board)
Player Start: the actual locations where players spawn in, attached to (and in proximity of) insertion points
AI Spawn Point: where AI may spawn in, depending on resistance level
AI Guard Point: define locations where AI set to Guard will go to
AI Patrol Route: define routes where AI set to Patrol will go to
Spawn Protection Volume: defines areas where one side cannot deal damage to the other side. Currently used in Uplink game mode to cause defenders to stay in proximity of the laptop.
Game Trigger: defines volumes that trigger game events when players walk into them. Used in Intel Retrieval game mode to trigger extraction, for example.
Extraction Point: defines the location of an extraction point flare.
Laptop Usable: for use in Uplink and Intel Retrieval game modes.
Bomb: for use in Defuse game mode Updated in v1034
Mesh: for placing predefined static meshes, usually for blocking sightlines to spawns or preventing movement to other parts of the map
Blocking: invisible blocking volumes for preventing players reaching certain parts of the map, or climbing over railings, and so on. Can be enabled and disabled using the Active property.
NavBlock: blocks the movement of AI through the map. Can be enabled and disabled using the Active property.
AI Hotspot: defines a volume that is displayed as an AI hotspot in Terrorist Hunt. Spawns inside the volume will be given priority if the hotspot is chosen as the active one.
Hostage Spawn: defines a spawn location for hostages in the Hostage Rescue gamemode.
The game objects in the menu are placed by dragging them into the level.

The toolbar affects movement and object interaction in the mission editor.
From left to right, the icons are:
(cross) Movement mode
(chequerboard) Snap to grid mode
(numeric drop-down) Grid size
(interlaced circles) Rotation mode
(four arrows pointing out) Scaling mode
(Earth or cube) Global or local adjustment mode
(whooshy person and numeric drop-down) Movement speed
(down arrow) Snap to ground
(eyes, question mark, hand, what?) Toggle visibility of map blocking volumes
As noted above, the movement speed can also be altered using the middle mouse button during a movement operation.
At the right hand side is a details panel which includes an Actor Overview and Mission Settings tab:
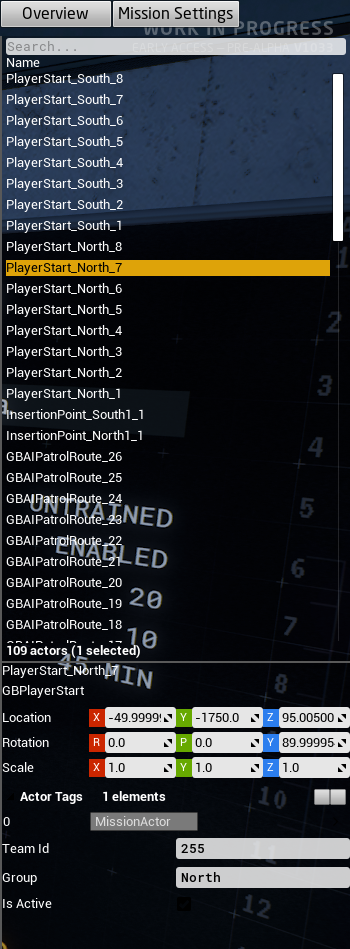
In the overview mode, all the mission objects in a level are listed down the right hand side in the mission editor.
A single click will select a mission object, and the relevant properties will be displayed in the data entry window at the bottom right.
A shift click will select multiple mission objects.
A control click will independently select a mission object in addition to the previous/current selection.
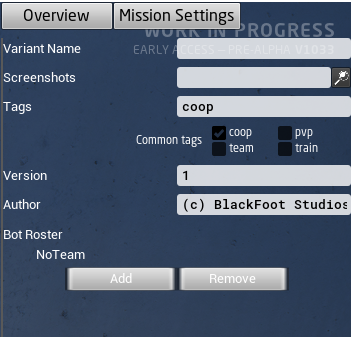
In the mission settings mode, as of v1033, the metadata for the mission, including variant name, mission type, and author details, is displayed at the top right.
If you are making unofficial additional missions, you will need to provide a variant name to allow your mission to be distinguished from the normal mission of that type. For example, you may choose a variant name like “Sniper Heavy”, which will then show up in the mission selector as “Map Name (Sniper Heavy)”
For co-op modes, use the tag “coop”. For pvp modes, use the tags “pvp” and “team”. This will help your mission show up in the right place. If you do not add any tags, your mission will not appear in any menus. You might only consider picking screenshots if you are making a variant mission using only part of the map, so it is only relevant to some of the available screenshots; otherwise just leave blank.
Summary: Press F2 to rename mission objects. Use the format THINGY_INSTANCE_1, THINGY_INSTANCE_2 and so on.
A standard format for every kind of mission object is as follows:
OBJECT NAME =
<Something>_N, where N = 1, 2, 3, …
e.g. GBAISpawnPoint_Kitchen_1, GBPlayerStart_Canyon_4
(This is because there is a standard variable type in UE4 called a name, and names use a specially hard-coded suffix N to distinguish between otherwise identical names. But perhaps better if we just say… this is the naming convention, because _reasons.)
You don’t have to use this format, but it will make your life a lot easier if you get used to using it.
|
To rename a mission object (in the right hand list) you have to select it and then press F2. The editor will attempt to append a sequential number to the end of the name you have specified. So if you press F2 and type “MyObject” it will actually be renamed to “MyObject0” or similar. To get things into a more appropriate standard format, always put a ‘_’ character at the end of the new name. So “MyObject_” will become “MyObject_1”, or “MyObject_2” if “MyObject_1” already exists, and so on. When the ‘_’ character is used, numbers begin at 1. |
This naming scheme is robust in the sense that if “MyObject_1” and “MyObject_2” already exist, typing any of “MyObject_”, “MyObject_1”, “MyObject_2” and “MyObject_3” into the rename dialog will result in the object being renamed correctly as “MyObject_3”.
Things become a bit more clever/confusing when you rename multiple items at once. If you select all three spawn points in an AI Squad, for example, you can put them all into the appropriate naming convention with one operation. For example, press F2 after selecting all three spawn points, and type “GBAISpawnPoint_HouseA_”. The spawn points will then be renamed GBAISpawnPoint_HouseA_1, GBAISpawnPoint_HouseA_2 and GBAISpawnPoint_HouseA_3. This will then allow the spawn points to be automatically allocated a squad number later on (see below), and helps organise the mission objects.
The numbering can still get a bit confused sometimes, with leading zeroes or missing numbers, and so on. This can be fixed by renaming to something temporary, then renaming back (with repeated uses of the rename key F2).
When renaming multiple objects, the name that you are editing is truncated to the last common letter of all of the names being edited.
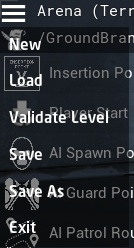
Click the top left icon (three horizontal stripes) to open the file menu. These options are generally self-explanatory.
Exit will return to the current mission, although after editing a mission and/or loading new missions in the editor, the current mission may become corrupted, so it is best to go back to the main menu and reload the mission if you want to play on.
Validate Level will run a game mode validation script (if present/defined) to give you information on any problems with the level. This validation cannot generally detect problems with AI spawn point, guard point or patrol point placement within the level, but it can detect more basic problems with missing actors, mismatching metadata, and so on.
Using the menu at top left of the screen, you can either open an existing mission or select a New mission.
The details for the mission can then be filled in using the mission settings tab (see above).
If creating a new mission or changing the game mode type, select a (new) script using the Script Menu at second from top, left hand side. Choose the “Select” script option. You will be asked to confirm you wish to proceed, and do so. You will then see a list of available scripts:
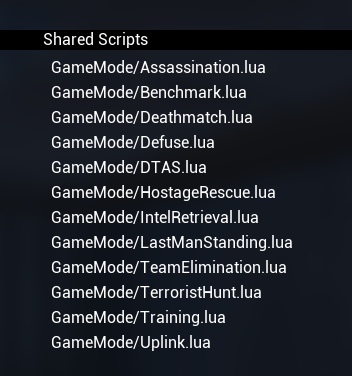
Select the game mode you wish to create a mission for.
You should then see something like this in the mission editor:

Once your script is selected, select Save As to create a new mission save file.
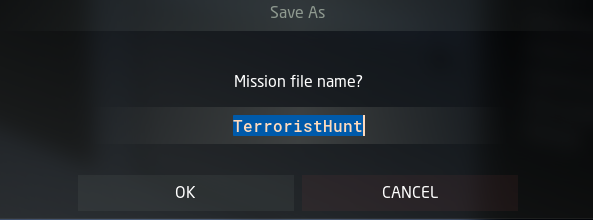
The file name is a combination of the map name and variant name (if used):
FILE NAME =
Game mode [any spaces removed] + “_(“ + Variant name + “)” [spaces replaced with underscores]
e.g. “Uplink”, “TerroristHunt”, “IntelRetrieval(Sniper_Heavy)”_
This creates a save file called something like “TerroristHunt.mis” in the relevant map name folder (e.g. “Arena”) in the GroundBranch/Missions folder.
Select “Yes” to save, and your mission editor screen should now look something like this at top left:
Showing the map, mission and script name. image::/images/mission-editor/top-left-corner.jpg[Screenshot]
You can now proceed to edit your new mission.
Normally missions require you to set up at least one Insertion Point, which define locations in the map where players can spawn, and a number (typically 8) of Player Starts for each Insertion Point, identifying precisely where players can spawn into the map at each insertion point. The Insertion Point actors are shown on the ops board and do not have to be located adjacent to the associated player starts. Therefore you can move around the Insertion Point to improve or adjust the appearance of the ops board (for example moving the insertion point further into the map if names are getting cropped out at the border).
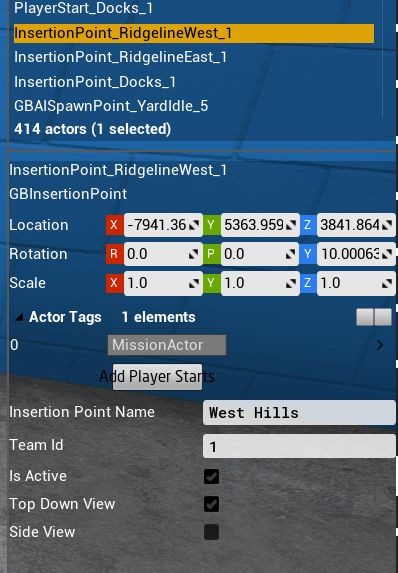
If you click on an Insertion Point in a map, the Add Player Starts button will automatically attempt to create 8 Player Starts in the immediate vicinity of the Insertion Point.
By way of exception to the above, the Deathmatch game mode requires only Player Starts to be defined individually all around the map, and the Dynamic Take And Secure mode does not require any Player Starts or Spawn Points to be defined at all.
Insertion Points have a name associated with them which should be filled in. Depending on the game mode, you will need to specify a Team ID (typically 1 for Blue, 2 for Red) and/or add “Defenders” or “Attackers” tags. See the section on the particular game mode for more info.
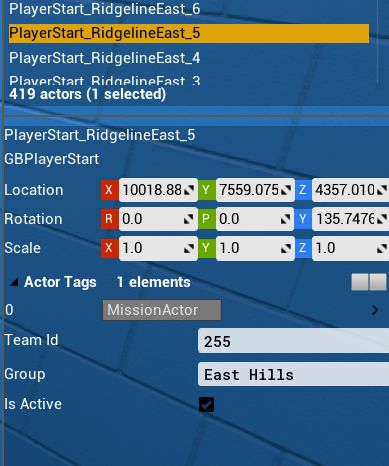
The group field of player starts is automatically filled in when generated from Insertion Points. The Team Id is typically set to 255, but other values can be used in custom game modes if desired.
Co-op missions and some pvp modes have enemy AI data defined. To set up the enemy AI, you need to create and edit AI Spawn, AI Guard Point and AI Patrol Route mission objects.
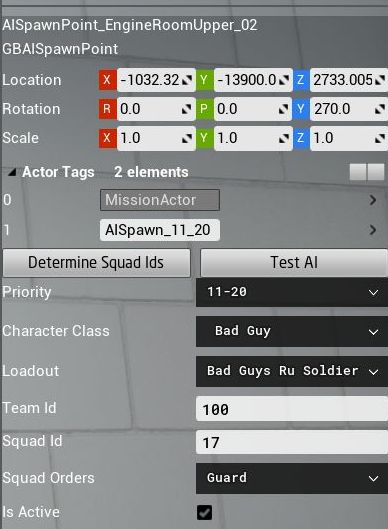
AI Spawn points are determined using the GBAISpawnPoint mission object, which can be dragged into the level from the left hand menu bar.
The character class should be set to Ky Bad Guy Updated in v1034. The loadout can be set to whatever you wish, but on the grounds of consistency and performance you should aim to use the same basic AI type (Rebel, Riot, or Ru Soldier) throughout each mission. The AI will spawn with the specified weapon.
AI Team IDs must normally be set to 100 (the default team, and standard team for AI in GROUND BRANCH). It is recommended not to set the Squad ID manually, but to use the standard naming convention for AI (see below), and as a final step to assign Squad IDs automatically using the Determine Squad IDs button. This is done by selecting all AI spawn points in the level, then simply clicking the Determine Squad IDs button. This will assign consecutive squad IDs to each detected group of AI spawns.
For custom game modes additional types of AI can be set up, such as unarmed civilians having a different team number, but game mode scripts must be adapted to ensure that the Opfor will not target the civilians (or target them until desired, and so on).
The standard naming convention for AI spawns is:
AI SPAWN NAME =
GBAISpawnPoint_<Location>_N where N = 1, 2, 3, …
e.g. GBAISpawnPoint_Kitchen_1, GBAISpawnPoint_FieldPatrol_2
So that a squad might consist of spawn points such as the following:
GBAISpawnPoint_Office_1
GBAISpawnPoint_Office_2
GBAISpawnPoint_Office_3
The “GBAISpawnPoint” part is just for consistency and need not be adhered to, but the remaining parts of the name are required in order for the automatic squad numbering to work (see above).
There is a concept of a ‘squad leader’, which is probably the first-named member of the squad. The squad orders field of each squad leader determines what orders the whole squad follows, though to avoid any uncertainty and confusion you should give all members of the squad have the same orders.
The possible squad orders are:
Guard: the game looks for an AI guard point group (see below) without an assigned squad that is geographically closest to the squad leader. The current squad is then assigned to that guard point group, and the squad members distribute themselves around the relevant Guard Points. Periodically the squad members will attempt to move from one guard point to another (if there are sufficient numbers of guard points). In the event of an alert/sighting of an enemy, the squad will normally leave the guard point and engage. Currently there is an issue stopping it from working, but in due course the AI will only move as far from the guard point as the MovementRadius field of the GuardPoint specifies - see below. You should set the MovementRadius field accordingly.
Patrol: the game looks for an AI patrol point network without an assigned squad that is geographically closest to the squad leader. The current squad is then assigned to that network of patrol points. The squad leader begins to follow the patrol point network, and the remaining members of the squad fall in behind him. In the event of an alert/sighting of an enemy, the squad members will usually abandon the patrol and advance towards the enemy.
Idle: the squad members stay at the spawn locations and do nothing. In the event of an alert/sighting of an enemy, the squad members will typically begin to advance on the enemy.
The priority setting determines how likely/important it is that the relevant AI will spawn. Priority 1 is the highest priority, and gives the greatest chance of the AI spawning. Many different factors are considered to determine which AI spawns are used. The routine is too complicated to describe in full detail but, in overview, the aim is to respect the priorities as far as possible, while giving every lower priority spawn a chance to occur.
For historical reasons, the priorities are grouped into Group 1 (priorities 1, 2, 3, 4, 5 and 6…10), Group 2 (priorities 11…20) and Group 3 (priorities of 21…30 and over). The basic rule is that all Group 1 priorities are spawned, and then the remaining spawns are divided between Group 2 and Group 3 priority groups in the ratio 70:30. However, since there are (intentionally) normally more spawns defined than spawns available (the resistance level), this rule is bent as required to fulfil the above objective, with spawns being picked randomly from the available pools.
In simpler (?) terms:
Give ‘must spawn’ AI locations a priority level between 1 and 10 (if you keep this number lower than typical AI counts, all of these points should spawn each time).
Give more common but not essential spawns the priority ’11…20’; and
Give more interesting/unusual spawns a priority of ’21…30’ or higher.
Having a fairly even distribution between the three different priority groups should give fairly reasonable results. The current method may not distinguish between priority 1 and priority 10, but future methods may do so, so it is worth considering the relative order of spawns in the 1-10 priority range.
| AI can only navigate in areas where the nav mesh is present (unfortunately the extents of this are not visible in release builds) so take care not to place AI spawns outside the apparent extents of the map, or on user-placed ‘mission’ meshes, or in otherwise inaccessible locations (such as on top of trees or in tree branches). When the AI is off the nav mesh, typically it will freeze and not react properly. |
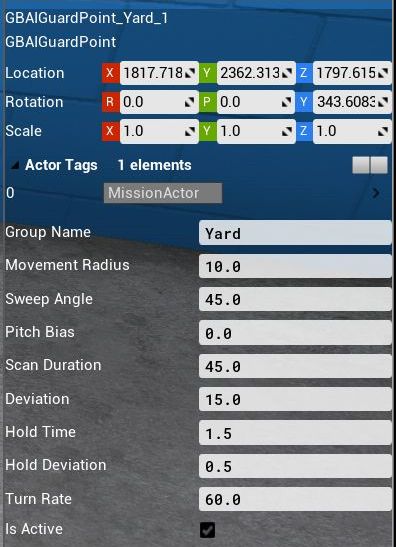
Guard points define places where AI will adopt defensive positions (if their orders are set to Guard).
Guard points are automatically grouped by putting the same Group Name for each point. Similarly, AI are grouped into squads by manually setting the same Squad ID (see above), or by giving the AI in the same squad the same base name and ascending suffixes _1, _2, _3, … and then clicking the Determine Squad IDs button, as mentioned above.
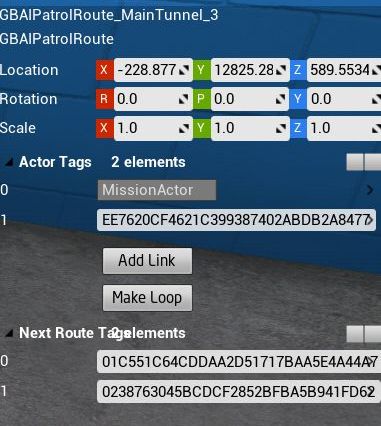
AI patrol points define a network of routes for patrolling AI to follow. Start by placing one, then click ‘Add Link’ and drag off the patrol route actor copy in an appropriate direction.
If you have defined a loop back to the first point, place the last AI patrol actor closer to the first actor than any other, and click ‘Make Loop’. If this does not work, move it closer still. An AI patrol path should look something like the following:

You can also add a link to a node that is already linked, creating a junction. You will have to manually copy and paste link IDs for multiple AI patrol route actors to set up more complicated networks.
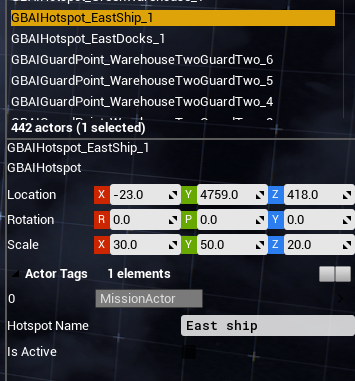
AI hotspots are used in the Terrorist Hunt game mode to define volumes within which AI spawns are given priority if the relevant hotspot is active.
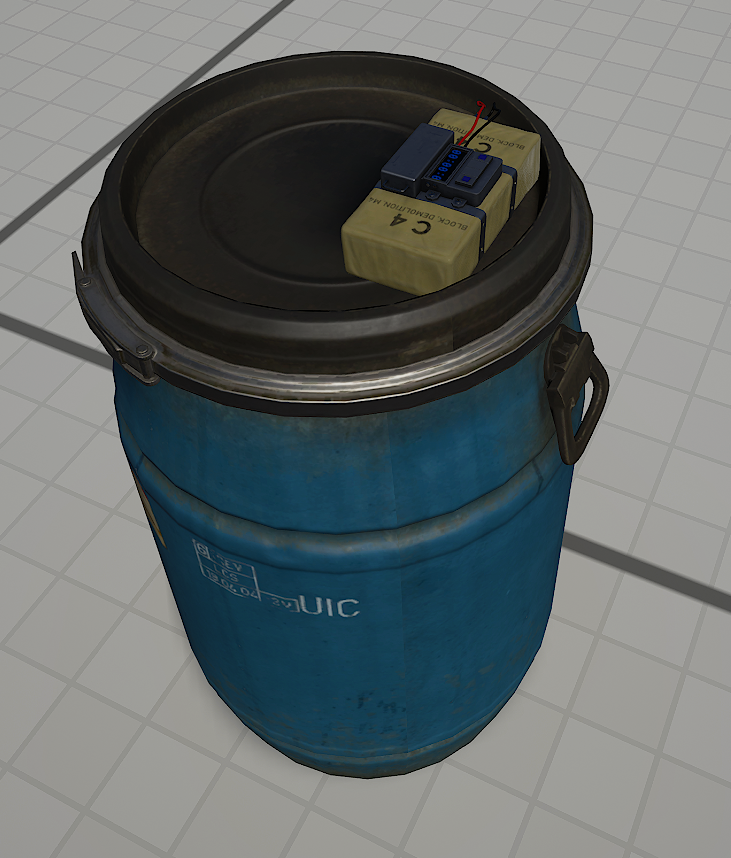
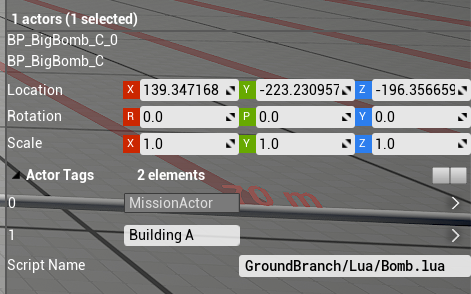
Bombs are used in the rejigged new Defuse mode. Any impact with the top C4 packet (including but not limited to shots at it) and any explosions in the vicinity will trigger it, usually causing a fail condition for the round. There are various call-backs that are made to the lua game mode script when the bomb is interacted with, allowing a degree of customisation of the response.
We will now look at setting up specific co-op game types:
Game mode summary: a desired number of enemy AI are spawned in semi-random locations across the map. The players pick one of a number of possible insertion points. When the round begins, players must then eliminate all AI to win.
Mission creation:
AI placement
As explained above, drag AI spawn points (GBAISpawnPoint) into the map from the left hand menu bar to create AI spawn locations. Use the movement and rotation tools in the toolbar to move and orient them to your satisfaction. The spawn points define all locations where the AI may spawn (or may not, depending on the resistance level and priority settings – see below).
in some cases, the placed AI spawns will collide with objects and the AI cannot spawn at that location. A note of these locations will appear in the log file when the particular mission loads. In addition, the AI character model will not show up when placed, but the AI collision capsule will. Also note the use of the Home key to fit actors to the ground.
For each spawn point, set up the priority, character class (Bad Guy), loadout and orders. Leave the Team ID as 100. Group the spawns into squads and rename those as described above, to have the same base name and ascending suffixes _1, _2, _3 and so on. When all the AI is placed, select all spawn points and click the Determine Squad IDs button to assign all the Squad IDs (see above).
Then create the guard points for the guard AI, and ensure that they are placed in close proximity to the guard AI, so that the AI will associated automatically with the correct guard point. Make sure all associated guard points have the same guard point name defined in their properties.
Set up patrol points, and do the same with the patrolling AI. Lastly, place idle AI wherever you wish.
You may prefer to place the guard points and patrol points first and then add the AI. You can use the Test AI button on the AI spawns to make sure that the AI moves to the correct guard point or patrol point, as appropriate.
Player spawns
Set up (ideally) multiple Insertion Points as explained above. You should give each Insertion Point a meaningful name, which will be displayed on the ops board. Set the TeamID of each Insertion Point to 1.
| It is best to place down new insertion points each time; copying insertion points will cause player starts associated with the first insertion point to change to the properties of the new insertion point. |
For each Insertion Point, click ‘Add Player Spawns’, and eight player spawns will be created around the insertion point. Make sure all spawns are validly located (not sunk into the ground or stuck in obstacles, and so on).
Your mission is now set up. Go to the file menu and select Validate Level to make sure you haven’t made any mistakes with the actor properties. Then make sure to save.
AI hotspots
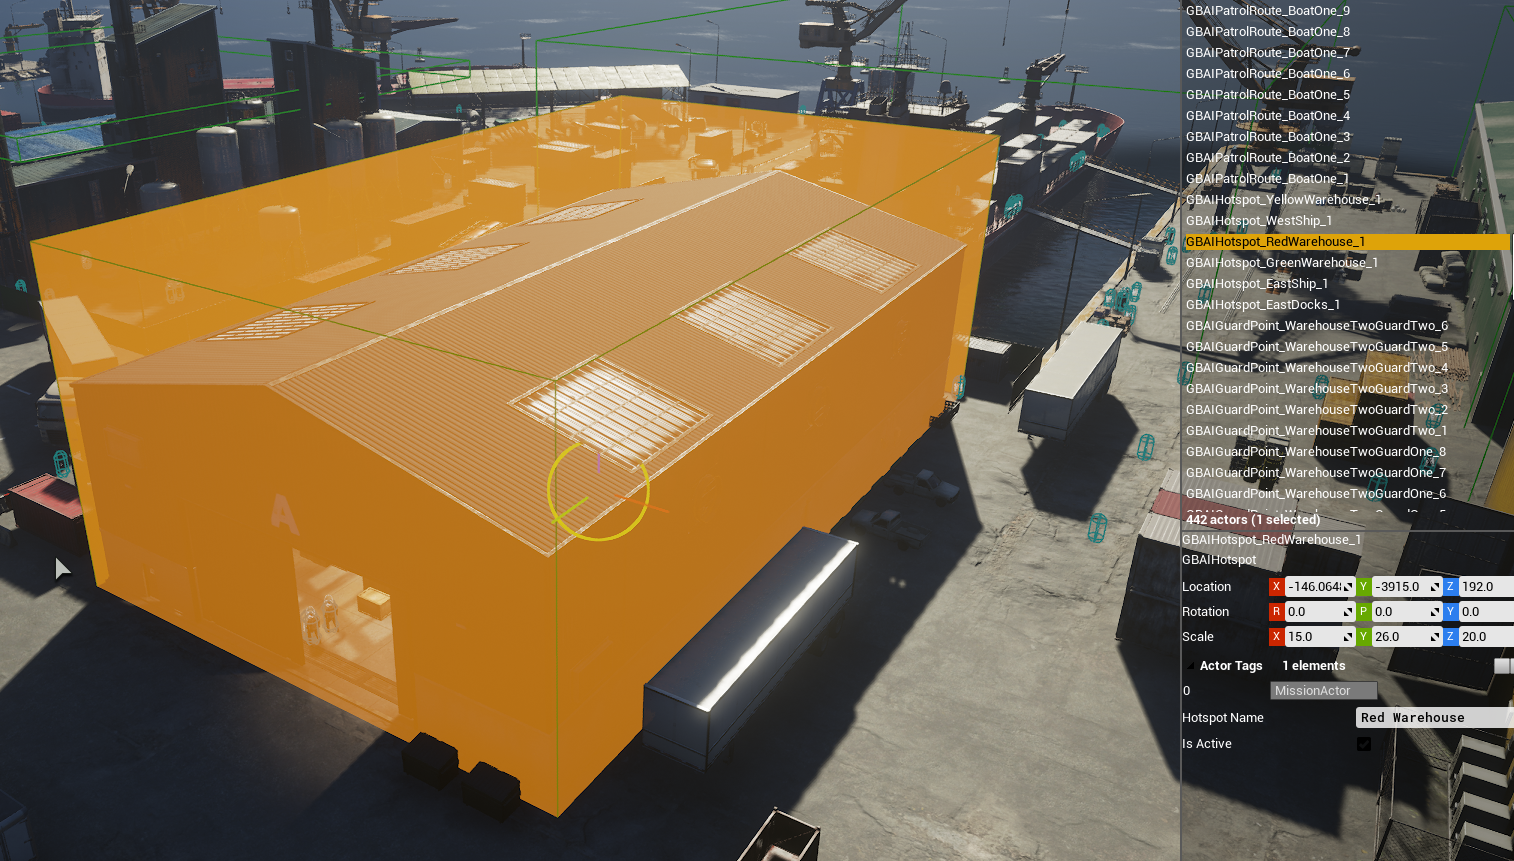
Place your hotspot volumes so as to fully enclose the area of interest, and give them a unique hotspot name (which will be displayed on the ops board). Each round, a random single hotspot will be chosen, and AI will be spawned giving priority to the hotspot. Hotspot AI are spawned first and (unlike subsequent spawn waves), the priority of the spawns is ignored, so more spawns and more unusual spawns should be created in those specific areas. It is recommend to include a number of very low priority spawns in each hotspot area to increase the randomness of the spawning relative to normal.
Game mode summary: a single military laptop is located in one of a number of possible search zones that are indicated with a red circle on the game map. A text description/definition of each zone is also provided to help with identifying the boundaries of the search area. After finding and investigating the laptop, you must carry it to an indicated extraction zone (with the rest of your team). There is an enemy AI force distributed across the map to stop you, and you will typically find concentrations of enemies around the (real) laptop location and the extraction zone.
Mission creation:
Congratulations! You have chosen the most complicated game mode to set up a mission for!
Player spawns
You need to set up two sets of Insertion Points, following the process described above in relation to the Terrorist Hunt game mode:
(1) player Insertion Points, as above, but adding an “Attackers” tag to each Insertion Point. Recommended naming convention: AGBInsertionPoint_A_<BriefLocationName>_1.
(2) virtual defender Insertion Points, defining laptop search area location and name. You just need to place an insertion point, fill in the name (which is used as the search location text) and add the “Defenders” tag. Lower case is fine; the name is automatically capitalised when displayed on the ops board. Recommended naming convention: AGBInsertionPoint_D_<BriefLocationName>_1. The insertion point name can/should include spaces. It is going to be used by a few other things.
As before, for each attacker Insertion Point, click ‘Add Player Spawns’, and eight player spawns will be created around the insertion point. Make sure all spawns are validly located (not sunk into the ground or stuck in obstacles, and so on). Do not add any player spawns for the ‘defender’ Insertion Points.
Laptop placement
For each laptop search location that you have defined, drag in (or copy) a reasonable number of ‘Laptop Usable’ actors from the left hand menu. Typically you want around 10-20 for each search location (the precise number is not important so long as each location has a similar number of laptops).
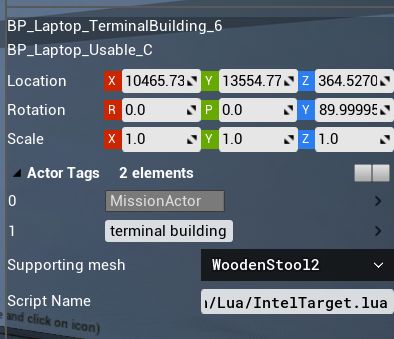
Each laptop must be given a tag corresponding (precisely) to the insertion point name of the relevant search area. For example, if there is a ‘defender’ insertion point with name ‘terminal building’, all laptops in that area must have the tag ‘terminal building’.
Laptops in the Intel Retrieval mode must have the script name GroundBranch/Lua/intelTarget.lua. You will be prompted to supply this script name by the Validate Level function if you have not already done so.
The supporting mesh is a new feature whereby a number of common supporting objects can automatically be spawned underneath the laptop, to improve the visibility of the laptop and the plausibility of the placement.
AI placement
Set up your AI as directed above in relation to the Terrorist Hunt mode. You can now set up some additional AI if you wish:
Each search location can have dedicated (‘conditional’) AI assigned to it/spawned when it is active (as the ‘real’ location). To do this, create AI spawns as before, but add the tag corresponding to the relevant ‘defender’ insertion point. For example, add the ‘terminal building’ tag for AI that will spawn only when the laptop is actually located in the terminal building (subject to the normal other spawning rules based on priorities - so give your ‘conditional’ AI spawns lower priorities, but even then, not all AI may spawn). You will also want to create additional guard points or patrol points for the ‘conditional’ AI to adopt if spawned.
Extraction points
You need to define at least one extraction point. After capturing the laptop, teams must all make it to the indicated extraction point. When the laptop is captured, a green flare will start to show at the extraction zone (previously it was always visible).
Drag in an extraction point actor from the left hand menu. Set Team Id to 1. You will probably want to define an extraction tag. This consists of ‘Extract’ plus anything else you want (in this case, somewhat exceptionally, only tags beginning ‘Extract’ are looked at).
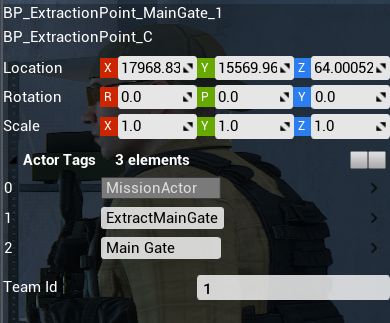
In this case, an ExtractSE tag is used for an extraction point located in the South-East of the level.
Firstly, you can create ‘conditional’ AI associated with the Extraction Zone (that is, they can only spawn if that active extraction zone is active) in the same way as described above, but using the Extract tag mentioned above instead of the insertion point name.
Secondly, you can disable spawn points in the region of extraction zones, by adding the relevant insertion point name as a tag on the extraction zone. For gameplay purposes it is usually desired to have extraction zones located far from insertion points to create better ‘flow’, and the selective disabling of insertion points creates a little more variety in missions.
In the example above, when this extraction point is active, the ‘Main Gate’ attacker insertion point (which is located nearby, and listed as a tag for the extraction point) will not be available to select on the ops board.
You can now also disable spawn points in the region of particular search locations (in case spawn points are particularly close) by putting the laptop search location/insertion point name as a tag on the attacker insertion point. If a tagged search location is chosen (whether or not it is the ‘true’ location) then all insertion points that have that insertion point name as a tag will be disabled.
| You must ensure that you have at least one ‘safe’ attacker insertion point that is not conditionally disabled either by extraction points or nearby search locations, in case players select the ‘show all search area’ option or otherwise get unlucky. The game mode will not check to see if any spawn points are enabled. See the Docks intel retrieval mission for examples of use. |
Objective marker modifiers: a number of special tags are defined which can add icons and numbers to objective markers (extraction points, search areas) used in Intel Retrieval, in particular. If you add a single one of these tags to an insertion point or extraction point, the relevant icon(s) will be displayed on the ops board and in game tablet map. See Appendix A below for a list of the currently usable modifier tags.
Congratulations! Your mission is now set up. Just kidding - go to the file menu and select Validate Level and then deal with the long list it produces. Now you’re done - make sure to save.
The Defuse game mode makes a return in v1034 as a co-op mode (players vs AI).
Bomb placement
| @TODO |
AI placement
Set up your AI spawn points (GBAISpawnPoint), AI guard points (GBAIGuardPoint) and AI patrol points (GBAIPatrolPoint) as discussed above.
| @TODO @bomb tags |
Player spawns
Set up (ideally) multiple Insertion Points as explained above. You should give each Insertion Point a meaningful name, which will be displayed on the ops board. Set the TeamID of each Insertion Point to 1.
| It is best to place down new insertion points each time; copying insertion points will cause player starts associated with the first insertion point to change to the properties of the new insertion point. |
For each Insertion Point, click ‘Add Player Spawns’, and eight player spawns will be created around the insertion point. Make sure all spawns are validly located (not sunk into the ground or stuck in obstacles, and so on).
Your mission is now set up. Go to the file menu and select Validate Level to make sure you haven’t made any mistakes with the actor properties. Then make sure to save.
PvP missions are generally more straightforward to set up, because there is not (normally) any AI setup to do. We’ll now look at setting up specific PvP mission types:
Game mode summary: In the Uplink game mode, there are attackers and defenders. The attacker/defender role switches each round, so that Red Team will attack one turn and defend the next, and vice versa for Blue Team. The Attackers need to find a laptop in the level and hack it to win. The defenders need to stop the attackers doing so, and can win by wiping out all attackers. There is no extraction process such as in Intel Retrieval.
When creating the mission, you must define a number of areas on the map (typically three) where a laptop could be placed in a number of places (again typically three) that are not so far apart that they will take a long time to move between, but also not so close that they are all simultaneously visible.
Mission creation:
Player spawns
You need to define a number of attacker Insertion Points and a number of defender Insertion Points (where laptops are located) in the usual way, including generating 8 spawn points per Insertion Point. The Team Id is not used; attacker Insertion Points must have the tag “Attackers” and defender Insertion Points must have the tag “Defenders”. The suggested name for attacker Insertion Points is AGBInsertionPoint_A_<LocationName>_1, and AGBInsertionPoint_D_<LocationName>_1 for defenders.
Laptop placement
Place ideally three laptops per defender Insertion point. Give each laptop a tag corresponding to the Insertion Point name of the associated Insertion Point. The laptop script name must be set to GroundBranch/Lua/UplinkTarget.lua. You will be prompted to set this by the Validate Level function if you have not already done so.
Spawn protection volumes
It is preferred to define Spawn Protection Volumes surrounding the defenders’ general area (such as an enclosing large building or compound). These should be sized and located to cover all areas of the map outside the (typically) central defender area, or surrounding each separate defender area if separated reasonably far from each other. The Team Id of the volumes is set automatically by the game mode script each round; do not worry about this property.
For the Uplink mode, make sure that No Immunity To Enemy is unchecked. Spawn protection volumes are switched off shortly after the round start, so the protection does not last.
Go to the file menu and select Validate Level and deal with anything it mentions. Now you’re done, and make sure to save your mission.
Game mode summary: Red Team and Blue Team are each assigned a different Insertion Point, and all spawn together when the round starts. One team wins the round when the other team is entirely eliminated. By default, each player has a single life, but it is possible to specify a number of player and/or team reinforcements/respawns. Any player in a team that dies will take a team reinforcement if available. When these are exhausted, player lives are depleted. In respawn modes, the game will try to respawn players next to team mates (to avoid spawn camping) but only if not too near a dead friendly body or enemy player.
Mission creation:
Create at least two insertion points with appropriate descriptive Insertion Point names, and generate spawn points as usual.
At the start of the round, a random Insertion Point will be selected from all available Insertion Points for each team. The setup process has changed slightly from GB version 1032.1: Team IDs of insertion points are only used in special cases like the Paintball and Arena maps, where two spawns are fixed in certain parts of the map. Otherwise, set team IDs to 255, so by default either team can spawn at any insertion point (for greater variety and randomisation).
If you need to stop teams spawning at insertion points that are too close together, you should now use the revised groups feature, by assigning a common gameplay tag to insertion points that you want to make mutually exclusive. It does not matter what tag you use, so long as each group has a unique tag associated with each insertion point.
It is possible to define multiple, overlapping groups if desired (using multiple tags for each point). For example, in the Small Town team elimination mission, the NE and SE spawns are given the tag East Spawns and the SW spawn is given the tag West Spawns. The latter tag has no effect, but the East Spawns tag ensures that no spawns will be chosen where one team is NE and one team is SE (these spawns being deemed too close). See City, Depot and Run Down team elimination missions for further examples of the mutual exclusion groups.
Go to the file menu and select Validate Level and deal with anything it mentions. Now you’re done, and make sure to save your mission.
Game mode summary: Players spawn individually and repeatedly. The first player to reach a specific frag limit or with the largest score at the end of a time limit is deemed the winner. A minimum number of players can be specified, with AI spawning to make up the numbers as needed.
Mission creation:
Place a large number of Player Starts all over the map. Place at least 16 but ideally more. Try to avoid line of sight between individual Player Starts. Try to place the Player Starts in relatively concealed locations to avoid coming into conflict immediately with existing players. Leave the Team Id at 255.
To support the AI feature, place (it is suggested) 8 AI Spawn Points at arbitrary locations (i.e. in the same place for ease of configuration). Keep the Team Id set to 100. Set a different Squad Id for each spawn point (e.g. numbers 1 to 8). Set character class to Bad Guy, and selected a desired loadout for each spawn point, preferably within the same type of bad guy (Rebel, Riot, Russian). Set the Squad Orders to Guard. The spawn points will be used in turn when spawning AI players (to provide AI properties, not location).
To make the AI players move about the map, create a single set or small number of sets of guard points spread across the map. Give each set of guard points the same group name (ideally leave as None).
Go to the file menu and select Validate Level and deal with anything it mentions. Now you’re done, and make sure to save your mission.
Game mode summary: Red Team and Blue Team spawn in entirely random locations in the level (unknown to each other). The defending team has to place a flag which marks a capture zone. The attackers have to get at least two attackers into the zone to capture the area. The defenders can block the capture by keeping at least two defenders in the zone. Each player’s watch provides bearing and approximate distance to the flag. The attackers can also win by eliminating all defenders. The defenders can win by eliminating all attackers but one.
Mission creation:
Create at least one AI spawn point if you want an AI player to provide an opponent when DTAS is played by a single player. Otherwise, place any number of AI spawn points, guard points, patrol points, and insertion points and player starts around the level so as to define the overall mission area and to define a few backup start locations for finding random spawns. It’s useful to provide at least one insertion point or player start to assist with the spawn finding routine.
In simple terms: just load a completed terrorist hunt mission, change the script type to DTAS, and save…
Go to the file menu and select Validate Level and deal with anything it mentions. Now you’re done, and make sure to save your mission.
Game mode summary: Players join attacking and defending teams. Team auto-balancing will try to maintain two more players in the attacking team compared to the defending team. Each round, a random attacker is picked to be the hostage, and is spawned at a random hostage spawn location, around which the defenders also spawn.
The attackers choose their spawn point, but the defenders do not. There is an initial phase in which defenders can move and set up their defences, but cannot leave the building in which they spawned. Then the attackers are able to move, and the defenders can leave the building if they want, but outside buildings they will not be able to see clearly or fire on the attackers.
The hostage is bound and has obscured vision, and cannot use weapons, doors, and so on. However, the hostage can escape or be rescued, and once their cuffs are removed by an attacker, they have full mobility and usability of items. However, as soon as a hostage picks up a weapon, they are fair game to be killed by the defenders. Up to that point, either side killing the hostage automatically and immediately loses the round. For gameplay reasons, hostages also cannot be killed by door breach charges. As soon as a hostage leaves the building, the spawn protection for the attackers is lifted, meaning that attackers have no vision or weapon impediments anywhere on the map. The attackers win the round by killing all defenders, or by extracting the hostage at any of the attacker spawn points. Defenders win by killing all attackers or lasting the whole round.
Mission creation:
Hostage Rescue is a bit of a pain to set up…
First, pick your buildings or areas of buildings where hostages will be captive, and choose your attacker spawn areas. Set up insertion points for these areas in a similar fashion to the Uplink game mode, including either the Defenders or Attackers actor tags as appropriate.

Then add player starts in the usual way, though it is recommend to have at least 12 player starts for defenders (and ideally 16) because all defenders will attempt to spawn in the same location (picked randomly at round start).
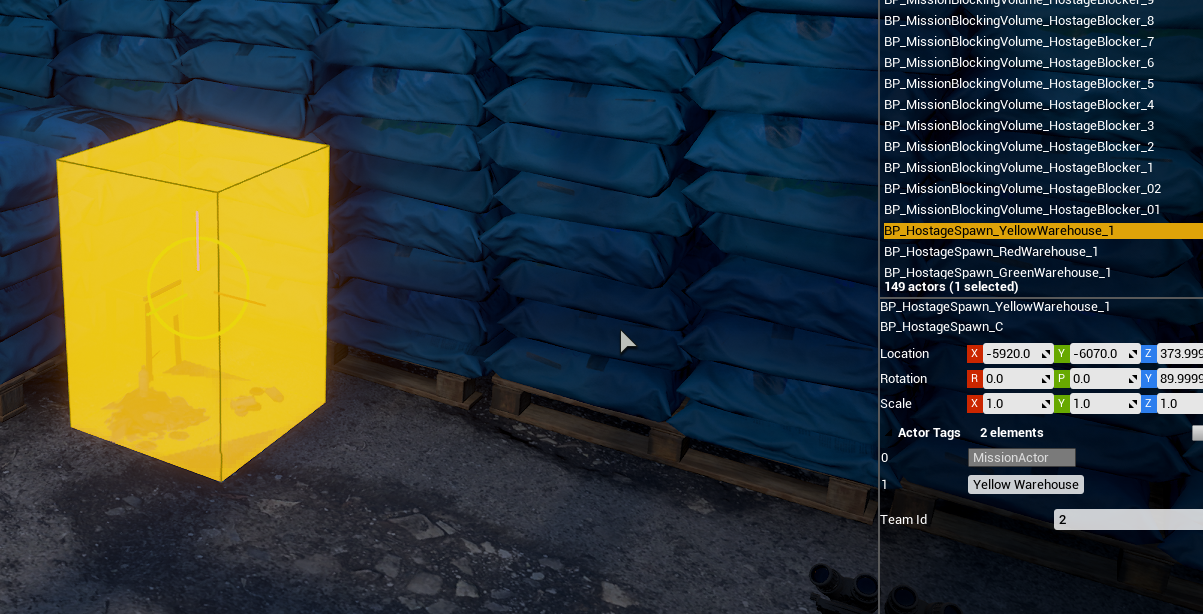
Next, place your Hostage Spawn actors, and give them the same tag as the associated insertion point.
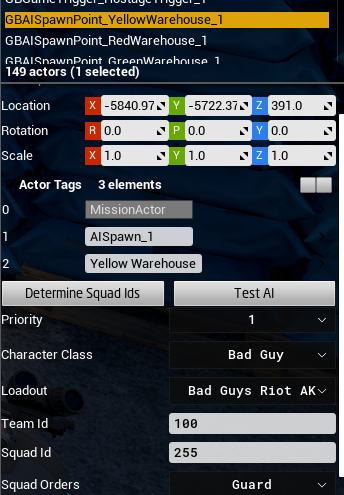
Next, create a single AI spawn point and associated guard points for each defender insertion point, in the usual manner, and give the AI spawn points the same tag as the insertion point.
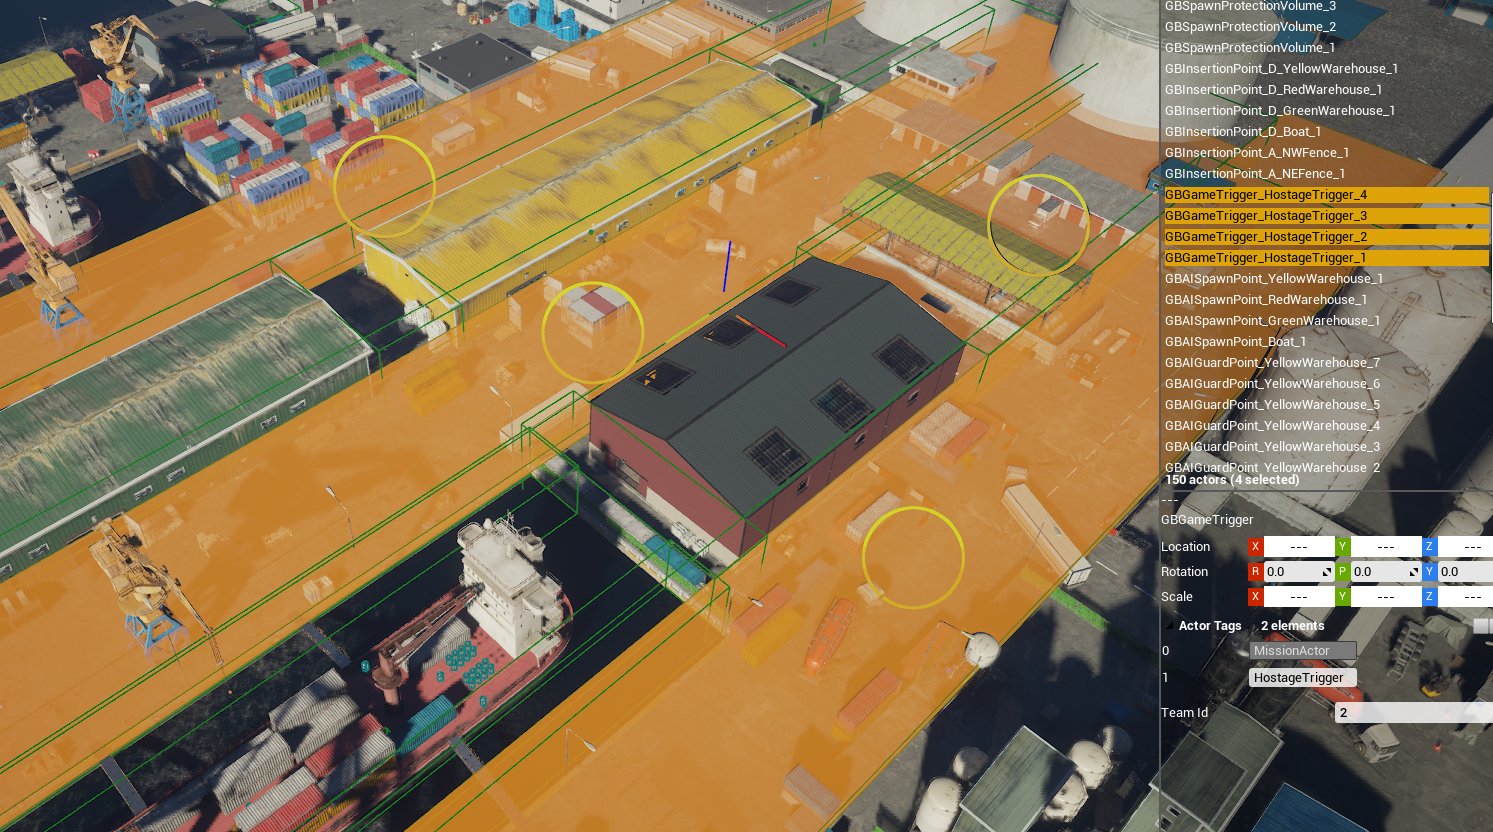
Next, place GameTrigger actors so as to cover all possible escape routes of the hostage outside the building where they spawn, and add the actor tag HostageTrigger. When the hostage enters these triggers, the spawn protection will be lifted:
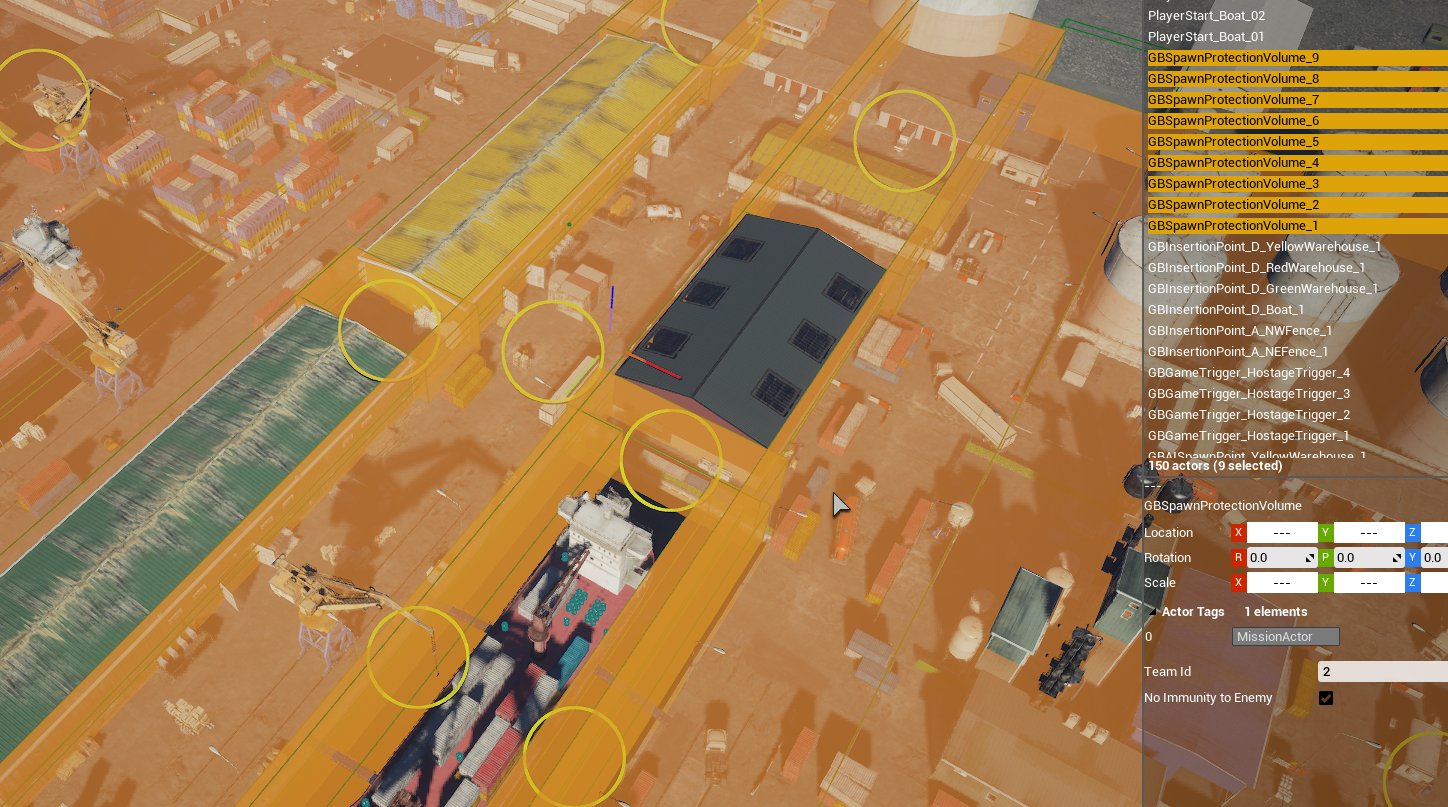
Now add spawn protection volumes outside the buildings, and make sure No Immunity To Enemy is checked for all (otherwise defenders shooting from inside the building will not be able to harm attackers):
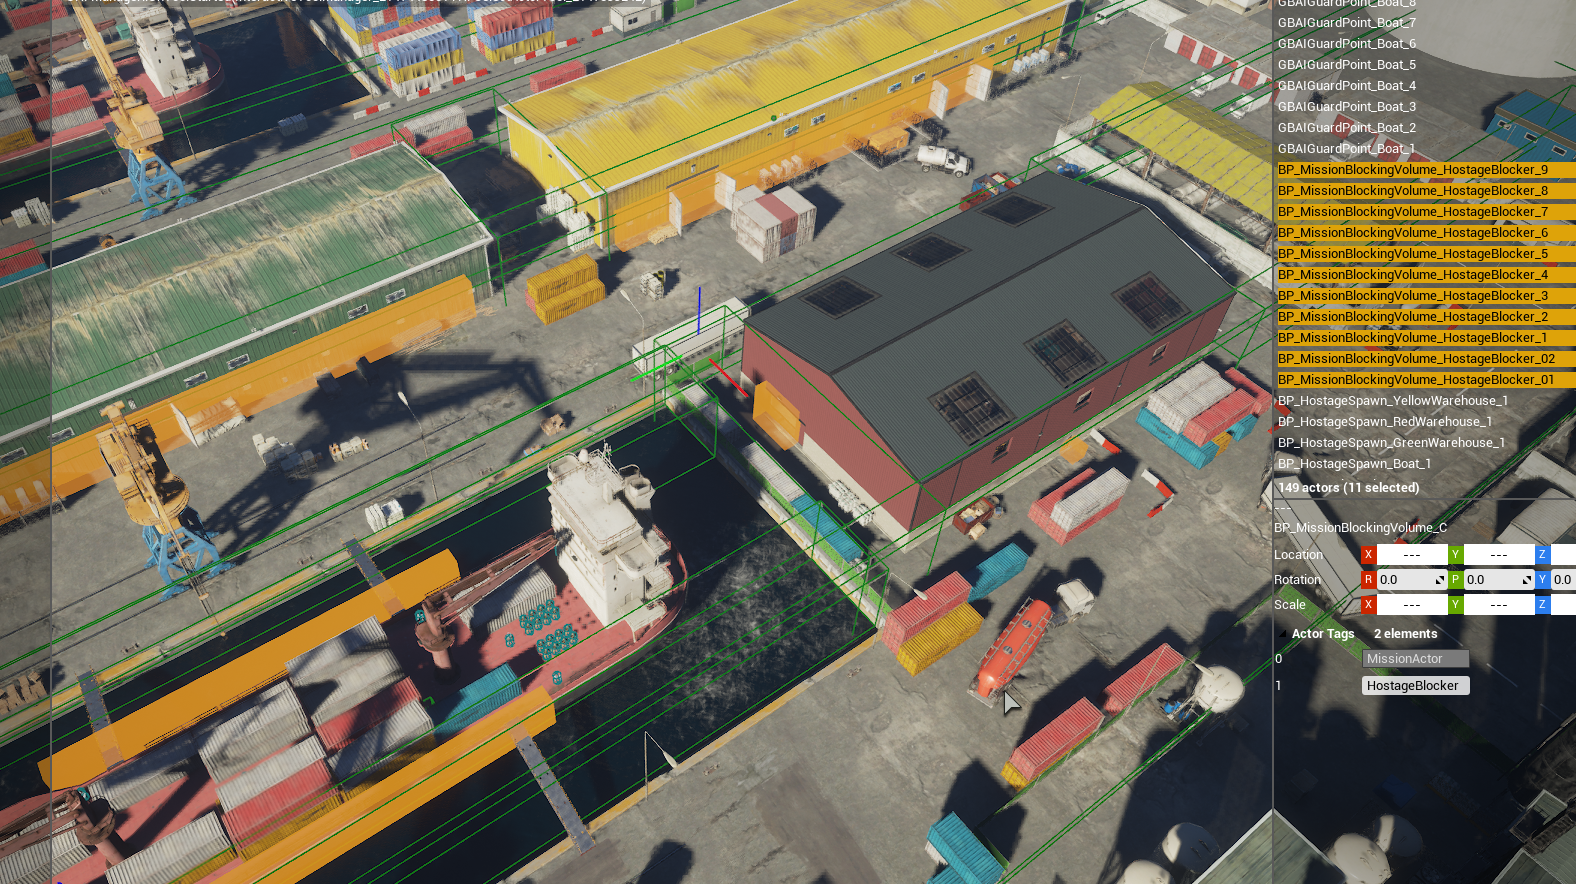
Next up is to add BlockingVolume actors so as to cover all traversable exits from all of the target buildings. Add the actor tag HostageBlocker to all of the volumes. These actors prevent defenders leaving the buildings during the starting phase, but are then disabled.
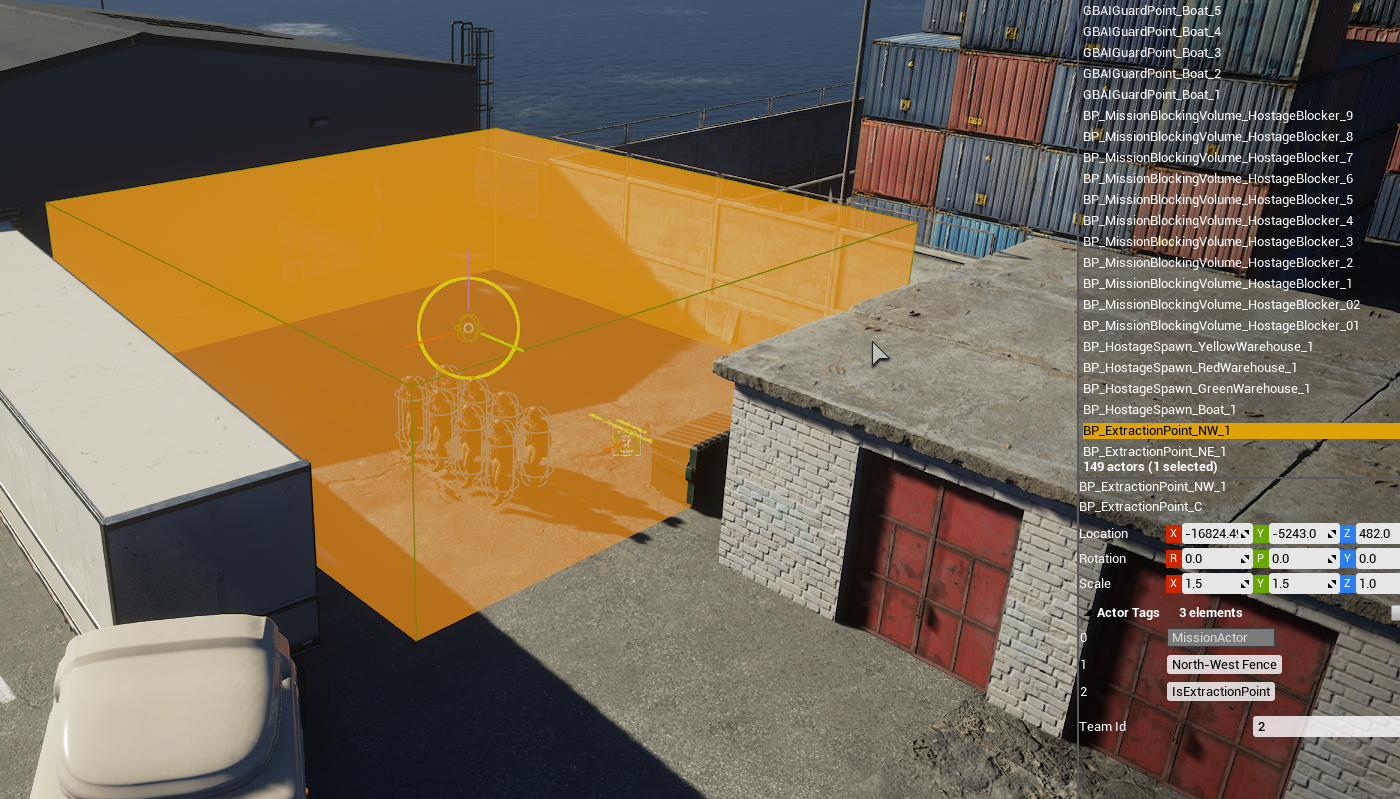
Lastly, place Extraction Zone actors at each of the attacker spawns. Give each zone an actor tag corresponding to the relevant attacker Insertion Point. Also add the actor tag IsExtractionPoint (because otherwise the game mode cannot distinguish extraction points and hostage triggers).
Don’t worry about the TeamID property. Ideally place your extraction zones behind the player starts, because the will immediately start to generate smoke.
Go to the file menu and select Validate Level and deal with anything it mentions. Now you’re done, and make sure to save your mission.
Mission meshes, mentioned above, are a mission actor that is selectable/draggable from the mission actor list. They can be set to one of a number of predefined static meshes using the dropdown menu in the detail panel. Mission meshes are intended for blocking sightlines to spawns (for example when a new spawn area is defined that was not originally foreseen by the map creator), or for preventing movement between parts of the map (typically when creating a 'variant' mission which uses only part of the playable space on a map).
As an example of the former use, some 747 missions have extra rocks placed around a spawn in the rocky area to the West to prevent spawn-killing by AI or other players. As an example of the latter use, the Depot (Compound) missions have various obstacles such as gates, walls, corrugated iron sheets and train carriages places around the periphery of the central compound, to prevent players from getting out into the wider map area.
It should be stressed that mission meshes are not intended to be used as a "map editor" replacement. Besides 'looking like ass', they will not be optimised and may not have suitable distance culling and suchlike. A more significant problem is that AI will not function properly outside normal the map area, so creating a new play area with mission meshes in an unused part of a map will not work, nor will creating new floors in the normal map area. In both cases, a nav mesh will not be present and the AI will be paralysed.
Full and unrestricted map editing is coming soon via the Ground Branch mod kit, so please hold tight for that.
There are a number of known/reported issues and unfinished/not working features, including but not limited to:
In The Farm level, any placed laptops and bombs will not disappear even when disabled by game mode scripts.
As noted earlier, AI can only navigate in areas where the nav mesh is present, and it is not currently possible to see the extent of the nav mesh.
User placed static meshes cannot be turned on and off by game mode scripts.
Bombs can be placed on the map and turned on by game mode scripts. However, the AI does not ‘see’ the bombs and does not navigate around them.
The bot system is a work in progress and is an experimental feature at present. It is not currently possible to nominate which bots will show up. It is recommended to avoid the use of bots in custom game modes at this time.
You may have to select particular objects or particular panels first to get certain key binds to work (this is a known issue also), but the following key short-cuts work in most places:
| Key | Action |
|---|---|
F2 |
Rename |
Ctrl-C |
Copy |
Ctrl-X |
Cut |
Ctrl-V |
Paste |
Delete |
Delete |
Home |
Snap to floor |
W |
Switch to move tool |
E |
Switch to rotate tool |
R |
Switch to scale tool |
F |
Zoom in to selected actor |
The main change from 1033 is that the AISpawnPoint character class has changed from Bad Guy to Ky Bad Guy. If you update these mission actors, your mission should work again. Game modes may need some updating too (see the Lua library guide documentation for more on that).
The behaviour of bombs has also changed (and likewise), though they were broken in 1033, so you are unlikely to have been using them…
A number of special tags are defined which can add icons and numbers to objective markers (extraction points, search areas). If you add a single one of these tags to an insertion point or extraction point, the relevant icon(s) will be displayed on the ops board and in game tablet map:
| Tag | Icon(s) |
|---|---|
AddUpArrow |
🡩 |
AddDownArrow |
🡫 |
AddUpStaircase |
◢🡩 |
AddDownStaircase |
◢🡫 |
Add1 |
Lvl 1 |
Add2 |
Lvl 2 |
Add3 |
Lvl 3 |
Add4 |
Lvl 4 |
Add5 |
Lvl 5 |
Add6 |
Lvl 6 |
Add7 |
Lvl 7 |
Add8 |
Lvl 8 |
Add9 |
Lvl 9 |
Add0 |
Lvl 0 |
Add-1 |
Lvl -1 |
Add-2 |
Lvl -2 |
© BlackFoot Studios, 2021-2024.
Please do not reproduce the contents of this document without permission.